

How Do You Power A Wireless Rv Rear Camera
Ane of the near hard things to do with a big vehicle like an SUV, a sedan, Buses, RVs, and trucks is to reverse since y'all do not take a clear view of what is directly behind you. Y'all might think that simply turning your head around would be sufficient but information technology nonetheless does not ensure that you lot are completely rubber when backing up. A solution that is readily bachelor to you is by purchasing a reversing backup camera and then that you lot can safely back upwards without hitting anything. " how to install fill-in camera? " and its uncomplicated guideline in here to help yous the all-time effort to install a backup camera in your vehicle.
To brand these systems work, you need to hook up a camera and a monitor to your vehicle accordingly. If you search online, you will detect photographic camera systems that can be used universally likewise as ones fabricated for specific makes and models. There will too exist a divergence based on the type of automobile you own. There are many models and types of back upward camera ranging from affluent mountain cameras, surface mount cameras, and license plate cameras to choose the best backup photographic camera for automobile rear, y'all first demand to know your test and preferences. For non-cars, that is trucks, and van you demand a truck or rear view cameras. Many people will choose to place the vehicle's lens on or effectually the back bumper or on top of the vehicle at the back.
Almost backup cameras are designed to utilise the automobile rear lighting organisation, this is convenient in that the camera is power on when yous hitting the opposite gear and send a betoken to the monitor at the front of the car. When you are reversing your vehicle, the photographic camera will activate and send a feed to the monitor and so that you can fill-in safely without fear of hitting an object. If yous are decumbent to hitting objects when bankroll up, then these systems volition prove to be extremely beneficial.
Why You lot Need A Backup Camera Installed In Your Car?
ane. Blow Prevention: Accident prevention is the main reasons for needing back up cameras for cars. You can minimize your chances of hit someone or something while backing up if y'all tin see exactly what is behind your vehicle, and that is only possible with a visual help, similar a backup camera.
2. Person: Installing a vehicle backup camera is a matter of safety and a must for those with modest children information technology can help those with poor visibility issues to forestall possibly hitting their children.
3. Reduce financial Loss: The other reason why you demand to install backup cameras at the rear of your car is as well the result of financial damage that may arise in one case you lot hit on objects. Although no data is available, the cost of all these back over accidents must be extremely high. The cost of injuries bated; let lone thinking of the cost to repair property, vehicles, and the time spent sorting out these accidents.
4. Required Accessories for Cars:The Fill-in camera systems represent the newest breakthrough in machine rubber. But similar the shuttering glass and the seat belts invented before this a current safety installation that cannot be avoided.
Wired or Wireless: What'south Right for Yous to Install?
Wireless Backup Camera: Digital wireless backup cameras utilise a wireless transmitter and receiver to transmit images from the RV backup camera to the monitor. Wireless RV backup cameras are the easiest to install, and two power source is needed. RV-like longer vehicles should go for the wireless version, as wired one becomes tough to get installed.
Wired Backup Photographic camera: In wired backup camera systems, the photographic camera/monitor is connected to a power harness. A cablevision is run the length of the vehicle connecting the components, and only one power source is needed. Wired Backup cameras may produce higher pic-quality than wireless ones, but the installation of this contrary photographic camera is much difficult as yous demand to run wires from back to your cab.
What Yous Demand to Install the Rear Backup Photographic camera?
The tools or accessaries to install information technology you volition demand are simple:
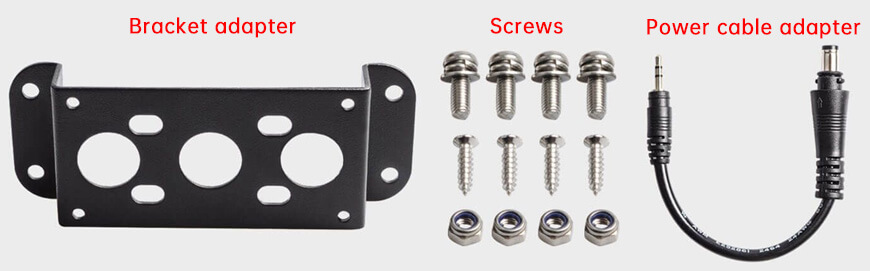
1. Furrion camera adapter:For the Furrion prepped RV, yous accept to utilize our bracket adapter to install the photographic camera to avoid drilling holes and cutting wires on your RV. For the RV doesn't come with Furrion mount, you may not want to drill holes, then you tin refer to this web log to install the backup camera.
two. Screwdriver
3. Pliers
4. Silicone sealant
Fill-in Photographic camera Installation Guide:
In this installation guide, nosotros will testify you how to install Haloview backup camera MC7108 on a Furrion pre-wired RV.
Pace ane. Purchase an suitable camera for your vehicle
Obviously, the first step is to detect an appropriate camera for your machine. According to the altitude from monitor to camera to cull the best backup photographic camera fit with your vehicle. We highly recommend using our Range Dominator series photographic camera arrangement when the distance over 33 foot.
Stride two. Check whether the monitor and photographic camera are paired.
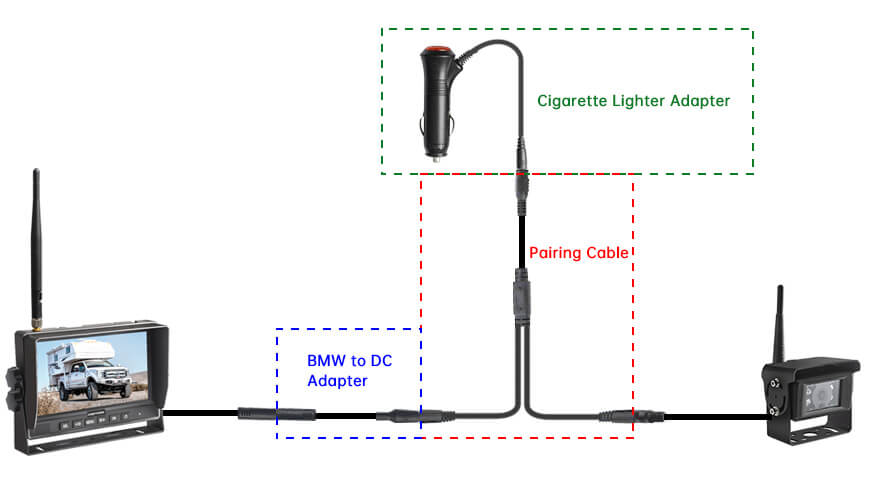
Plug the cigarette lighter ability cable adapter into the cigarette lighter in your cab, then connect it to the Dent Cable, at the end of the Paring Cable are two DC male connectors, which you can connect to the power cable of the camera and monitor. Delight refer to the wiring diagram below. Press the push on button on the cigarette lighter power cable adapter to get them powered.
If the camera is non paired to the monitor, you tin can follow the steps below to pair:
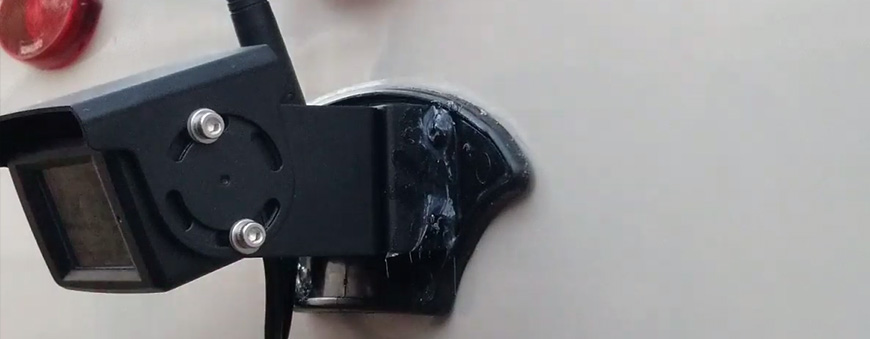
Step iii. Remove the Furrion mount from your RV.
As you tin encounter in the left picture, you'll desire to remove some of this sealant to access the screws with bract or screwdriver. Afterwards the sealant removed and the screws taken out, you tin can just pull the shark-fin bracket off which will expose the wiring. The rubber gasket we will be keeping it just since it does a expert job of sealing out the water.
Step iv. Inspecting the trailer wires.
Removed the rubber, here you'll really see where this wiring, it is converted over to the 12-volt and that goes into the clearance lights, the backup photographic camera volition get ability from here. With the Furrion wiring adapter, which is included in the Furrion camera adapter, you don't have to do any cut of wires.
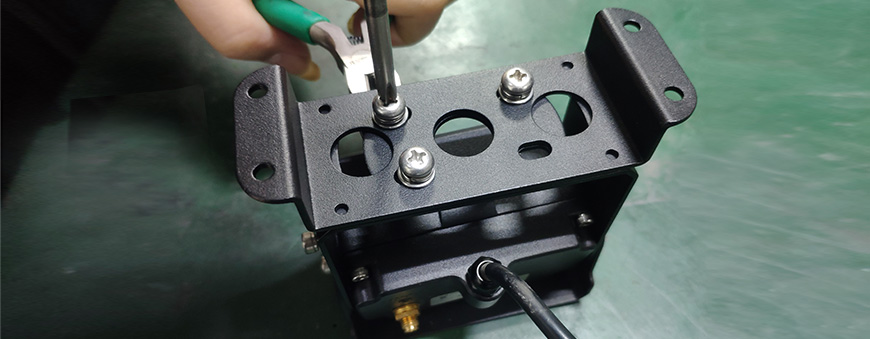
Step five. Assembling the Haloview mounting bracket.
One thing you'll need to know is our bracket adapter, information technology'll line upward with the mill hole on the Furrion rubber, so you won't take to drill whatsoever unlike holes. To get the brackets hooked up, y'all need to put the screws this way like the picture below, clamp the nut with pliers and apply the screwdriver to tighten them.
Stride 6. Connecting the camera to the trailer wiring.
When you have the camera hooked up, dorsum to the ladder and connect the camera to the trailer wires with the Furrion wiring adpater. Before you actually mountain it and finalize everything, you have to test out the camera and the monitor in instance that the voltage not enough to get the camera powered. Some Chevy or GMC truck's power supply voltage is not plenty to get 12V for the trailer, then y'all need to add this booster module to solve the result.
Step seven. Test the camera and monitor.
Ability on the monitor and turn on the clearance lights to activate the camera wiring, and then what yous have to do is cheque whether your monitor has an image, if information technology doesn't, read your installation manual for troubleshooting information. The adjacent stride you can complete the backup camera installation.
VERY Of import TIP FOR PEOPLE INSTALLING WITH A FURRION BRACKET ON THE Back OF THEIR RV:
Furrion wire is attached to RV'due south rear red marker lights. After you take installed the camera upwardly on the RV, you must plug in your vehicle to the camper with your 7 pin cord, and then plow your actually headlights on in the vehicle....Not daytime running lights because that won't turn on your RV marker lights. That'southward how the Furrion pre-installed plug gets its power, thru the red marking lights.
Step 8. Mounting the backup camera to the trailer.
Now you lot need to add silicone sealant to preclude h2o from entering the wall, put some silicone in the four mounting holes, and then when the screw goes in, you will seal information technology, also add some where the wire goes in.
Running the cable through the center hole on the prophylactic and putting the wires inside the wall, so information technology will not dangle outside, Fiberglass RVs wall is filled with white foam, you can hollow out a small area with your hands. A very important tip: don't put all the wire back inside the wall, you can make a drip loop.
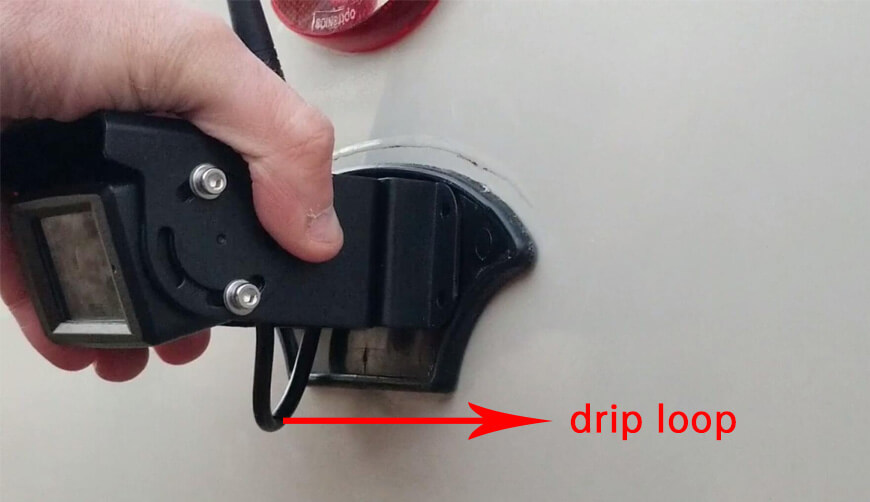
A drip loop just like on a subpar line outside your business firm or if yous go look at the internet cable or phone lines coming into your house, you lot'll really see this petty loop of wire cablevision hanging down and so that if any water gets on it, the water will go downward and so drib off, otherwise, the water will follow and go right within the hole, so with a baste loop you'll have information technology go down and just drop off the bottom.
Put the four screws in and get it mounted up, then add a petty scrap of silicone to the screws, and so when you tighten them down, it'll make a prissy waterproof barrier. Next, tighten them down and add silicone over the top of prophylactic, and it'south very of import don't silicone the bottom since if any water were to arrive, you'd desire to exist able to baste out the lesser, if y'all sealed it and it got in the top, it would puddle inside information technology and they would have nowhere to go except for in the trailer.
Footstep nine. Final test.
At present, you have the photographic camera mounted and everything's wired upward, get into the cab and test the monitor to make certain it's working properly. Arrange the angle view of your camera to ensure that information technology effectively covers the area you want to see. Then you need to install the monitor. The almost common places for the monitor are on the dashboard, the windshield, and in the rear view mirror.
Congratulations! You've just installed a new backup camera on your RV. If you're experiencing problems, please contact us via support@haloview.com.
Finally.
A fill-in camera vehicle system volition be a peachy tool to enable you lot to operate your valuable vehicle more safely and efficiently. Only that does not replace the skill and experience that comes from knowing how to apply your vehicle as it was intended: exercise using your backup camera arrangement in a local parking lot, backing it upwards into a infinite made of cones or tape. A piddling effort and exercise can preclude the possibility of an accident, and yous will be more comfy with its functioning and capabilities.
Sidebar
Source: https://www.haloview.com/blog/how-to-install-backup-camera
Posted by: markshowere.blogspot.com
0 Response to "How Do You Power A Wireless Rv Rear Camera"
Post a Comment